Ad

New, modern yurt build in Mongolia

I just want to add that I have 2 new favourite tools.

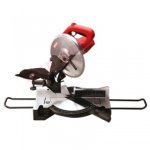
A power miter saw makes quick and accurate cross cuts. It can cut through 10cm (4”) lumbar in one cut. Angle cuts are easy and accurate. Before I had to cut twice with a circular saw and ended up with sloppy results.

487BF57F-BF4C-4F0F-93F2-F7F90FC9C334.jpg

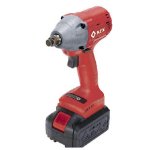
A cordless impact driver/drill can install long lag bolts with ease. Before I had to use 3 tools to counter sink, pre-drill and fully tighten lag bolts.

5524276E-EEA9-4D39-B7DE-B3B5F1B1113D.jpeg
 
Re: New, modern yurt build in Mongoliax

Your bathing area is gonna be heaven. This thread is so good I was talking to my wife about it, and got her in here to check it out. That lead to a short conversation about the real important things in life. Warm bathroom. Hot water. Sauna. Warmth in the winter, shelter from the wind. Frequently folks that have all that take it for granted- UNTIL they are 'camping' and don't have it. Your place is looking GREAT U.K.! You are gonna love it! NICELY DONE!!! Thanks.

Wow, yes. It’s a great project, potentially an incremental set of improvements. I’ve never created a home from nothing and it’s getting slowly better. It actually hasn’t been a terrible hardship to live without running water for 6 months. The natural beauty up here compensates for the rough living. One adapts and makes adjustments.

That being said, when we do add improvements, they are very exciting and one gets a fresh appreciation of luxuries, like hot and cold running water. We don’t have that yet but we will within a week or so.

I’ve always loved solving problems. So this is fun. The connection between gers and bathroom is such a problem. The geometry is tricky. There’s a serious risk of having leaky joints if I get it wrong.
 
Side note. I started buying chopsaws in 1983 when I went full time into trim carpentry. Back then chopsaws consisted here in the U.S. of 9" Rockwell. That was it, there WERE no others. There was a huge 14" Makita that was fine for framing but way the heck too big for trim.

I've literally gone through eight chopsaws since then. I have three DeWalt 'big bird' yellow double bevel compound miter saws in my shed right now. Too bad you're on the other side of the earth or I'd give you one.

I had brand new big bird ripped off jobsite in 2004, along with 'Hoppy' my RolAir hotdog compressor from 1983. I had just upgraded the single cylinder pump to ball bearing version and it was a quiet stroker. Lemme tell yuh I wanted to square with that thief that was a GREAT compressor. They quit making them like that last century.

Have fun enjoying your work.
 
Last edited:
Thanks for sharing, Bob. It must really hurt to have the tools of your trade ripped off. I try to keep my most valuable stuff in our shipping containers. Gers have really weak security so I was adamant about buying two 20 ton containers with upgraded internal locks.

We rarely leave home and when we do we get a neighbor to house sit. We’re getting a dog soon. He’s a rescued puppy and needs his vaccinations before we take him. I’m looking forward to making him an insulated kennel with off cuts.

My goal is to have the connection fully roughed out and sealed by the end of this week.
 
Cool! Enjoy your work!

Container is about as good as it gets on site. Yup ripoffs suck. I've had my share over the decades. Theft is rampant. Theft is as old as mankind.
 
A small bit of progress in the last couple of weeks. Mostly functional things, not cosmetic.

The bathroom/hallway is fully connected and mainly finished outside minus the metal trims which go on the corners and roof edges. This is mainly cosmetic. We'll probably paint the exterior to blend with the gers more but it's not a high priority. Having a functional indoor bathroom is the top priority. Making it pretty can wait a while.

Progress is being made on the interior of the bathroom flooring and plumbing connections. My handyman poured the self-leveling "concrete". When it's dry we'll add an insulation mat and underfloor electric heating. We've bought all the bathroom fixtures which he'll install. I'll post again when that's done.

Still tons of work to do but we'll have the basics done by the middle of next week hopefully. I can't wait to have a hot bath again. It's been a while!

IMG_3664.jpeg

IMG_3668.jpeg

IMG_3669.jpeg
 
Last edited:
Excellent as usual. Thanks.

Side note. It took me 365 days to build our house. March 30 1999 to March 30 2000. I was 45 when I started. Without any doubt 'THE' toughest year of my life. I had to dig really deep. I worked 50 days straight 6 weeks after getting both my left rotator cuff tear repaired and left bicep reattached (using open surgical technique,not arthroscopy) tearing my bicep loose at the elbow setting windows on this house. Four months later I had the right cuff tear repaired. Lemme tell yuh I found out what I was made of that year. That right there taught me 'what's what' more than anything else I have ever accomplished. And edit to say, I officially retired two months ago at 68. And man, lemme tell yuh I am DIGGIN it. haha
 
Last edited:
A year is a long time for building a house, isn't it? I suppose it depends on the crew size and how much time can be devoted to it.

I suppose that's the nice thing about a ger. You can put a traditional one up in a day. Ours took maybe 3-5 days for both with a crew of 3. I wasn't any help then due to my sciatica.

Now I'm almost fully recovered (again) I'm working at a slow pace but it's better than nothing. As a fellow-retiree, I'm not in a big hurry as long as the essentials are in. I also have to be careful not to re-herniate my back again. Going at a slow-pace means I'll never run out of things to do, haha.

We had a nice bit of weather last night and all today. I'll share a short video.

https://www.facebook.com/1575290823/videos/pcb.10226430359136695/449154094004578
 
Good job UK. Way to go.

This has zip to do with yurts. It's about fortitude, toughness, applying yourself, giving it everything you have. How you face adversity.

Back in fall 1999 I had to extend our building loan from 9 to 12 months. It was obvious I wasn't get the house built in nine months, due to falling behind from recovering from the double surgery on my left cuff and bicep reattach.

At the loan extension meeting, our loan officer said, "Look Bob, I gotta be straight with you. You HAVE to be done in a year. I don't care how you do it. You HAVE to be done in a year. There is no additional loan extension beyond a year."

Well OK. A few weeks later I had my right rotator cuff surgery Jan 4 2000. haha But by God, I WAS back to work in about a month, and the house was done March 30, 2000, the deadline.

It was frickin murderous but I did it. THREE surgeries in that year. I also did my regular finish work for the first few months while framing. Our home was 'hobby house' at the start.

OK now back to yurts. I built my first 14' yurt from scratch. Eight full days of work. Completely destroyed in a blizzard. Then scratch built my 16'er, and then redid it down to 12'er. The 12'er is in storage now. I built my 10x12 barn shed in June 2020 on the yurt platform. I built us a 10x15 greenhouse last April. I'm thinking I'm gonna add a second door and turn the 12' yurt into a green house next spring.

Anyway, just yakkin. I've thoroughly enjoyed your thread.

Here's to good health. :clink: edit to add your video won't play.
 
Last edited:
We've made quite a lot of progress on the bathroom/hallway connection between our twin gers. Almost all the major fixtures are in now. Just need to install the window, partition walls and barn style doors. To speed things up, I'm going to use glu-lam panels just screwed to the 10x10cm (4"x4") frame.

These glulam panels come in similar dimensions to plywood/sheetrock etc. I might do something prettier later on but we need something up very quickly. We have a lot of family and friends and I don't know how they'd appreciate going to the toilet or taking a bath in full view.

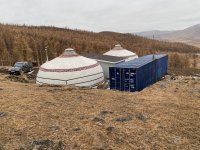
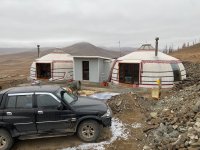
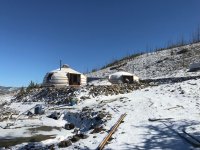
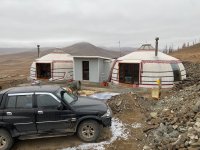
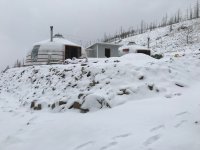
Let the photos begin with a recap. By September our gers were fully built but unconnected. We had an outhouse toilet and a well but nothing connected to the gers themselves. We had to hand carry water 30 metres in plastic containers from the well house.

IMG_2927.jpeg

And the winter came early. The well head/pump is in the foreground.

IMG_0802.jpeg

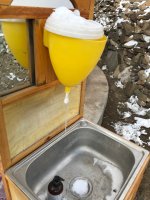
Washing facilities were basic. This is what most Mongolians use in gers without running water. We kept it outside because it leaks until it freezes.

IMG_0850.jpeg

We also needed to protect the well head from freezing. So we had this well house built. It's about 30 metres away and the outhouse toilet is about another 20 metres beyond that. Not so much fun at night to go to the toilet so we used a bucket/potty in our bedroom. Classy!

IMG_0991.jpg

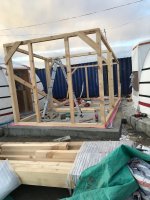
I got to work on the framing of the bathroom / hallway after some locals poured a concrete slab for me. Wall and roof coverings are the super fast install steel insulated sandwich panels with 15cm (6") of EPS.

progress on framing with temporary braces.jpeg
IMG_3669.jpeg

It was an upgrade to be able to walk through from living room ger to bedroom ger without going outside in this kind of weather.

IMG_0955.jpeg

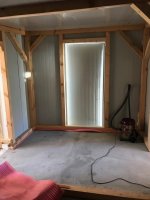
Here are some progressions of the interior of what was essentially a shed/barn style build.

Roughly framed and covered. Temp door.
IMG_0901.jpeg
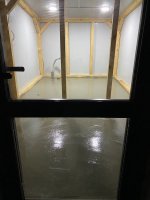
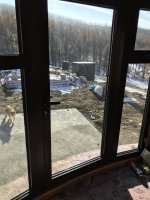
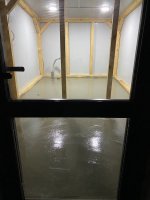
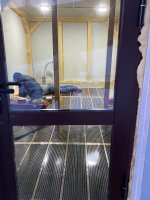
Pour self-leveling floor. Install double glazed aluminium door. Lots of passive solar heat in the day.
IMG_3664 (1).jpeg
Lay insulation pad and underfloor electric heating.
IMG_3706.jpeg
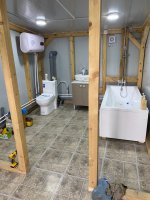
Pour another layer of self-leveling floor (not shown), let dry for a few days and then glue down vinyl tiles. Do all plumbing and electrical connections.

We are still missing walls and barn doors (glu-lam panels), window above sink and lots of trim to hide the rough bits. I might leave the plumbing exposed because I like it and it's easy to access in case of problems.
IMG_3928.jpeg

We still have lots of finishing touches to do which may go on forever. BUT we can take a bath, a shower, and use the toilet. After 6 months of NO indoor running water/bathing etc, it's the simple things that I took for granted which now seem like luxuries.

The heating is keeping up nicely with night time temperatures down to -22C (-8F) and dropping to -40 C/F on the coldest days of January. The well house and one container are insulated and have WIFI enabled radiators which I can monitor and manage from the gers. So far they are keeping up. Batteries and a diesel generator provide backup during power outages. Wood stoves and a propane space heater provide supplementary/backup heating.

I think we're ready for winter. Fingers crossed.

Still to come an improved kitchen with a sink, shelves, etc. We have a very makeshift kitchen but it's a mess and ugly.
 
"..it's the simple things that I took for granted which now seem like luxuries." That's the absolute truth right there.

I've been here since 2013. This is by far the best thread ever on the yurt forum, U.K. Thanks.

Bob
 
Oo, nice. Thanks so much. I really appreciate your positive support. I hope it's interesting to some folks. When it's all done, or done to a level where I can take a break, I can maybe make a YouTube documentary on the build out. At the moment, I'm just too busy to put all the material together but I can post snippets here and on Facebook.

Latest news and credit where credit is due:

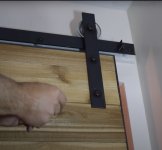
We were looking at "barn door" hardware kits and they are crazy expensive - up to $130 per door and we need 3. Countryside Mongolians are resourceful and I like to think I am too, so we'll just put together some flat steel stock and wheels (pulley style) on a stock steel overhead track. I got some ideas from YouTube DIY'ers. Like this:

DIY barn door hardware.jpg

Even for a fraction of the price of the kits they can look pretty nice, especially if painted. In the end, each complete barn door (wood plus hardware) should cost me about $60. So I can make 2 full doors for the price of just one hardware kit.

Side note: I just don't understand how these kits are so expensive from a mass production factory. Is this just a case of supply/demand vs true costs of manufacture? In other words, if people are willing to accept price gouging then we're happy to oblige, right?

Well, full disclosure, I'll still have to pay for labour for my helpers but I'd rather give the money to them than to some manufacturer in our nearest neighbour. Speaking of that, just for interest, our labourers charge us anywhere from $18 to $50 per day, based on their skills. I pay them whatever they ask without grumbling or haggling. I think it's a bargain and it keeps them happy enough to give us priority over less generous/complaining/non or slow paying clients.

I see it as a long-term relationship which should be nurtured and treasured.

My main guy is Paul and he hand picks his helpers when necessary. I've known Paul and used his handyman services since about 2016. He came highly recommended and is well-known in the expat community. He grew up in an orphanage run by Christian missionaries from the USA. It's like a family and they all speak fluent American-accented English but also Mongolian which is a huge advantage. You can't be just a one trick pony in Mongolia so he's a self-labeled handyman but college trained as an electrician.

Screenshot 2022-11-18 at 12.07.15.jpg

I'm mainly the ideas guy and prefer carpentry although I'll pitch in with anything. I see a problem and think "wood". Paul is mainly an electrician and welder. He prefers metalwork. So between my ideas and a discussion, we can usually come up with a practical, and cost-effective solution. I believe he SAVES me money by finding a less-costly way to approach a project. It's a good relationship.
 
Real good job on the barn door track U.K. I've installed a few barn doors. Never assembled and fabricated one from scratch. I am impressed by that.

The door hangers in the kits always had a 'J' strap to house the roller. They can be goofed up, I've done it. And as you mentioned, kits went from $$ to $$$$(!?) in cost. All from China of course regardless of cost.

Good stuff here buddy. Thanks again.
 
Real good job on the barn door track U.K. I've installed a few barn doors. Never assembled and fabricated one from scratch. I am impressed by that.

The door hangers in the kits always had a 'J' strap to house the roller. They can be goofed up, I've done it. And as you mentioned, kits went from $$ to $$$$(!?) in cost. All from China of course regardless of cost.

Good stuff here buddy. Thanks again.

Thanks for the kind words and encouragement!

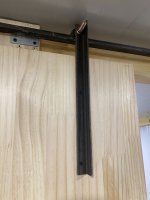
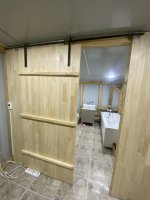
The first door (a prototype / test case) is practically done.

Paul the handyman and I put our heads together and came up with a rudimentary track system using automotive bearings and angle iron for the track and hangers. It's not quite finished, a couple of tweaks will improve it but, like most of our solutions, they function but aren't conventionally pretty. I'm a function over form type guy. I quite like minimalistic and rustic sometimes industrial looking stuff. Perhaps they are pretty in their own way.

Beauty is subjective but the cost saving was substantial. The door AND hardware probably cost $30-40 all in. Now we have a solution, we can do the doors between the hallway and each ger. These will be essential to control our pets, noise, and chilly drafts. I'm very happy to use barn doors instead of traditional swinging doors.

IMG_4130.JPG


IMG_4129.JPG

The weather is getting brisk. It was challenging to work outdoors in -20C temps, even with the sun. Probably because we had some winds to add some wind chill. But it was necessary because have a new family member. A 4-month old (maybe labrador/border collie mix) puppy dog rescued from the streets of Ulaanbaatar then adopted by us.

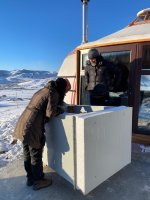
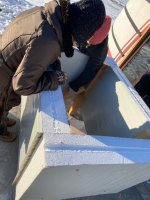
He can't live in our gers - too many cats already - so he needed a dog house ASAP and I love to use leftover building materials where possible. We are also getting a Tibetan Mastiff puppy around the new year. So hopefully, they'll share for a bit until they grow too big. I have enough materials to make another dog house. It takes about 3m x 1m of wall panels and some roof panel (about 1.7m x 1m). Probably even more for a full grown Tibetan Mastiff.

So, I designed a simple steel sandwich panel kennel using our leftovers. 4 posts made with 10cm x 10cm lumber give it a frame and something to attach the sandwich panels to. It's essentially the same materials and design as our bathroom but on a tiny scale. A friction fit 15cm EPS floor with carpet keeps the cold out. The door is tiny but it should be in the type of winter we face. 15cm of EPS all around should be adequate down to -40C. We'll see very soon. The forecast is showing -40C/F by the middle of next week.

IMG_4118 (1).jpeg
IMG_4119.jpeg
IMG_4120.jpeg
Dog house.jpg
 

Attachments

  • IMG_4131.JPG
    IMG_4131.JPG
    2.2 MB · Views: 301
Thanks for the update dude. New bath is looking very nice indeed. That hot water is gonna be NICE!! Those foam walls should work good. We framed/foamed trailer water supplies in Wyoming. One side would get unscrewed for access. We also wrapped them with elec. heat tape.

It hit -50f in Jackson Jan 1 1979. My wife and I were living in a small 2 bed apt that had single glazing. There was a sheet of ice on the lower half of the sliding glass door in the kitchen. That ice fall flowed out onto the floor as it built up. lol I was working on the party walls above the roof of the new Super 8 motel thanksgiving week in 1982, in -20 temps. No nail guns back then unlike now. If I put nails I put in my mouth to free up a hand they froze there. lol Kids are funny.
 
Thanks for the update dude. New bath is looking very nice indeed. That hot water is gonna be NICE!! Those foam walls should work good. We framed/foamed trailer water supplies in Wyoming. One side would get unscrewed for access. We also wrapped them with elec. heat tape.

It hit -50f in Jackson Jan 1 1979. My wife and I were living in a small 2 bed apt that had single glazing. There was a sheet of ice on the lower half of the sliding glass door in the kitchen. That ice fall flowed out onto the floor as it built up. lol I was working on the party walls above the roof of the new Super 8 motel thanksgiving week in 1982, in -20 temps. No nail guns back then unlike now. If I put nails I put in my mouth to free up a hand they froze there. lol Kids are funny.

Great stories. Working outside in Mongolia generally stops in the countryside from December to February. Except for the most pressing, emergency issues. All exterior construction is usually finished by October and won't start again until May. Of course, interior work can continue.

That being said, in the city they work on tall apartment buildings all year. I guess they can do the concrete work on the floors that are finished. Probably get some artificial heat in there somehow and partially enclose it to retain some heat.

For me and probably most people, it's not the core body heat that is a problem. It's keeping my hands from going numb. My hands call it quits before anything else. Then nothing else to do but go indoors and warm them up - doesn't take long - and go back out again.

I've thought about getting an empty oil drum and making a brazier type fire to extend our outdoor work season - typically used by striking workers or homeless people. It also could be nice just for hanging out on the patio anyway. We'll do something more permanent next spring, like a firepit with seating.
 
Yup, if you can't use your hands you're done. 55 gallon burn barrel with air holes around the base works OK. I've warmed myself up by one at the gun range a few times.
 
Yup, if you can't use your hands you're done. 55 gallon burn barrel with air holes around the base works OK. I've warmed myself up by one at the gun range a few times.

So let's talk about winter heating for gers/yurts.

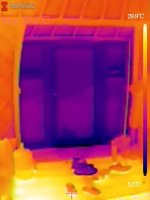
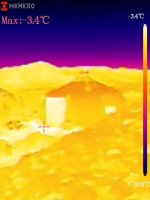
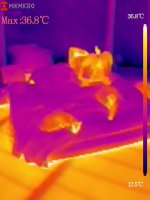
Our main heating source is electricity because it's very cheap here and even cheaper at night. About 4.5c per kWh in the day and 3c per kWh at night for comparison's sake. I'll add thermal photos in theme with this topic. (FLIR type). They were taken before the recent cold spell so they don't show what it's like now.

Here's our bed with wife and cats. The underfloor heating is clearly visible. Min/max temperatures are in the bar graph.
01 underfloor heating.jpg

Wood stove warming up. It gets a lot hotter, perhaps to 300-400C.
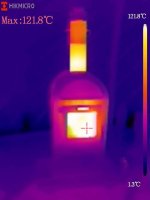
02 wood stove working.jpg


However, even with cheap electricity it can add up a LOT and we SHOULD have a backup with our somewhat unreliable grid power. It's not guaranteed. If the power goes off, we'll survive but our systems (particularly water) are vulnerable. I shudder to think about getting up in the night to turn on a manual start diesel generator to stop the pipes and water tank freezing.

Last night it dropped to -37C (-35F). The daytime high will be -22C (-8F).

Our main source of heat is electric underfloor. We have 6 zones in the 2 gers and bathroom/hallway. This uses about 7-10kWh for the whole area. The main supplementary heat source is wood stoves, one in each ger. If the electricity failed at night, we have a large propane space heater and a diesel air heater as a last resort (runs on a 12v battery).

This proved adequate last night (the coldest night so far in the gers), although our bedroom ger temperature dropped to 10C (50F) by the morning. That's almost a 50C (122F) difference between inside and outside - not too shabby. 10C in the morning feels okay in our ger with warm bedding but the first person out of bed will need to start wood fires to bring the inside temps up to a comfy 20C (70F) or so - that was my duty this morning. The sun has the same effect but we don't get hit by sun until about 10:30am (warming up the gers by 11:30am) due to our mountain valley aspect. At this point we can lower the underfloor heating or sometimes even turn it off.

What we can do to improve the insulation? We're making some insulated curtains for the doors and window. These are significant areas of heat loss. Behold (on a not too cold night).

From inside:
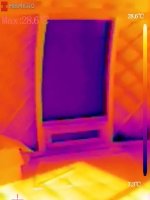
03 heat loss at windows.jpg
04 heat loss at doors.jpg

From outside:

05 heat loss outside.jpg

Note that there isn't as much heat loss in the crown despite it being single-glazed. So doors are 1st priority and windows 2nd.

So that's this week's project because, although this week will "only" be in the
mid -30C range, it can get to the mid -40C range in January.

The next issue is to insulate our outer buildings. These are metal buildings and I wanted to monitor them without physically going there - and losing heat by opening the doors. They are windowless. The well-house is a metal stud building with metal exterior walls and OSB interior walls. The insulation is basalt wool batts.

We decided to just insulate one of our two shipping containers this winter (20 tons each). The insulation is 5cm (2") EPS sheets, floor to ceiling and spray foam at the seams. It was the cheapest way by far.

For heating them, we bought 2 electric radiators with WIFI connectivity. Unfortunately, WIFI doesn't penetrate metal buildings very well. So I ran ethernet cable to each, added a POE injector (provides) power and WIFI access points. These allow the radiators to be connected via WIFI and then ethernet to our router in the ger.
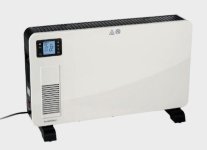

electric radiator with WIFI.jpeg
Gigabit POE in box.jpeg
TP Link access point.jpeg

Here we can see the "Tuya" app which allows me to monitor and adjust the two different radiators. The reading is for the shipping container which is holding the temperature that I set - a good result on an extremely cold night.
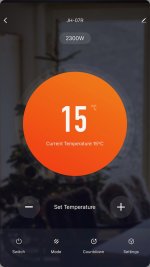
Tuya screenshot.jpeg

The only problem remaining problem is that if the power goes out, the radiators can NOT remember their settings when the power returns. They don't go back to where they were without human intervention. This sucks. I can't think of a way around this yet, so I have to monitor the heating regularly. If I was away, I'd be screwed. So we probably won't be able to go without a house sitter who I'll need to teach the system.

Whereas the underfloor heating remembers the settings that I chose when the power returns. I'd like to add smart thermostats to the underfloor heating but have to buy them from abroad.

Luckily, we don't really have power-cuts at night (fingers crossed). They are generally a daytime thing.

 

Attachments

  • Gigabit POE injector out of box.jpeg
    Gigabit POE injector out of box.jpeg
    40.2 KB · Views: 157
Thanks for the details U.K.

As for window treatment, back in 1980-82 we were living in subzero Jackson Wyoming. The weatherization shop I worked out of sold 'Window Quilt' brand window treatment. That was a company in its infancy in 1980.

This Window Quilt' system consisted of a five ply sandwich of two exterior decorative fabric, over two very thin layers of foldable synthetic insulation sandwiching a mylar core. The two exterior surface fabrics were embossed to eachother in a polka dot decorative pattern that sealed front to back. The core materials couldn't shift or pull apart.

The edge piping slid inside a nylon C channel with mounting flange that attached to either side of the opening. 'Peel off' tape applied at the factory sealed C channel to a smooth flat surface. A weighted sash bar mounted on the bottom of the quilt sealed the bottom.

In use the quilt rolled down and up the side channel via a roller system. It could be locked off at any height with a side pull on a cord. The quilt fed off a top storage roller and rolled behind a second roller that kept the quilt ~tight against the top trim surface. Ideally all four edges were sealed in an A grade install.

Sometimes it took some pretty creative redo carpentry to get the quilt to work as designed. I also made pine valance box at the top as a decorative option if the customer wanted. The roller assembly was purely functional, there was no decorative valance in the kit.

When installed tightly with no binding anywhere on a flat perimeter window casing- they were VERY effective at holding in the heat. The biz I worked at had an infrared gun that clearly showed the effectiveness with quilt up and down. Also as a new business we asked for home/trailer owners response after the install, and it was ALWAYS positive. Some just did not like the look. People adjust to everything in time though.

Anyway there you go. I looked online and it appears the company is still in business. I'm sure the options are a magnitude greater than they were 40 years ago. Back then it was likely a mom and pop hippie biz trying to go mainstream. I bet they ain't rolling that way now. haha Edit to add, the quilts came in specific widths. The carpenter had to figure out how to roll on each install prior to ordering.
 
Last edited:
Well how about that. I just looked at the 'Window Quilt' online site. Amazingly the quilt itself hasn't changed in 40 years. To me that's a strong testament of just how good it is. Their boilerplate product isn't a load of crap. For a fact I know that when installed properly it's a very good product.
 
Back
Top