Ad

Platform posts options for moist clay soil

jona

New member
My biggest issue is that im running out of options due to soil issues regarding what type of foundation to use.


I can do screw poles,but this is gonna be rather expensive so im looking for a alternatieve, but the soggy (clay) soil is an issue.


The fear i have is when the yurt is starting to sag i have no realistic option to lift it to level and the option to break down everything to tackle the problem is not appealing to say the least.


So my qn is what are the options that can be used knowing i have to deal with the saggy clay soi.
 
I can do screw poles,but this is gonna be rather expensive so im looking for a alternatieve, but the soggy (clay) soil is an issue.

You want an cheap & solid solution - this seems IMHO to be in diametral position to each other.

An good earth anchor system has its price, but is reducing headache in this case.....

But I´m open to read about other opinions. :)
 
Thanks everbody for your reply's.

Due to the fact that english is not my home language i find it difficult to understand what your answers mean.
Please use a picture when possible.

As for slab when this means concrete that is no option.
 
Due to the fact that english is not my home language i find it difficult to understand what your answers mean.

For better understanding you can use online translation (copy/paste) like DeepL:
https://www.deepl.com/

Or install the DeepL-Extension ("Add-on") directly in your browser.

I don´t need it for the English language, but I´ve good results with Russian & Ukrainian websites.

HTH from another "non-native-speaker"..... 🙋*♂️
 
That's cool Ralex. Nicely done.

Yes poured concrete slab.

If money is really tight, and you have a flat site, do a 'bathtub floor'.

Level the site as best as possible. Clean all debris away. Roll out a heavy duty poly tarp a couple feet to say four feet wider than your yurt diameter. Erect the yurt on the center of that tarp. Fold the floor tarp up on the outside of the lattice, UNDER the wall cover, and secure with the low and mid tension bands. You can trim the tarp to round once erected if you like.

You can also do this same system atop pallets covered with osb or plywood, or just sheet goods on the ground. Roll out cheap indoor outdoor carpet inside, or rugs, linoleum-whatever you can get ahold of.

The BIG disadvantage of no platform and a tub floor is not being able to let a cool breeze blow in at the bottom of the wall, by hiking up the cover a foot or so, and tucking it back under the low tension band.

If you have a sloped site, sorry-you're gonna be spending money building a platform. I know zip about screw anchors.

All I know is, necessity is the mother of invention. You WILL figure a way to get this done, if motivated. Good luck.
 
Last edited:
There's an older youtube video I watched many years ago of a young couple in the Netherlands, Holland, Belgium- somewhere very green and wet- that used the bathtub floor tarp system. They covered the tarp inside to make it nicer. I believe the yurt was 16' in diameter. Anyway there you go. Good luck.
 
Here's another possibility. If the platform is low to the ground, and the site is pretty flat, consider building a platform that is sitting on concrete pads. I built my 16' yurt platform using that method. The2x4 platform framing is sitting on 4" thick pads that are laying on the ground. The pads are merely 4" sections of sonotube filled with concrete. There's an anchor from the bottom of the framing down into each pad. There are about four dozen pads under the framing.

If you want to see some foundation details described above, copy and paste:

Bob Rowlands homemade yurt

Mine is the rustic yurt with the green door and rafters either side.You can plainly see the perimeter framing and pads in a couple photos. This was a VERY CHEAP way to build a very good platform. My 10x12 barn shed is on that platform. It's still level and in great shape 9 years later.
 
For my admittedly small 12" yurt platform, I used RV levelers on top of concrete blocks. I used 16 of them in this pattern. My site in on an incline, with a 12" drop from front to back, so I raised up the front set, and dug in the back set. In retrospect I would rather have put the low set just above grade, then raise the front up more. For each block, I leveled it, packed it down with a tamper, then filled it with road base a few inches deep, then tamped that down using the block itself. I put the required number of concrete blocks on top the tops were all as level as I could get. I then put the RV levelers right in the middle of their range to allow for settling and movement. With this system, you permanently have the ability to adjust the height of each leg up to the limits of the levelers. In the unlikely event that you hit the end of one or more, you can re-do ALL of them if necessarily. That requires your plumbing to have a small bit of vertical flexibility, but if you're not making something truly stationary like a concrete slab or deep pylons, you should include that anyway. The levelers aren't too expensive (I think I just paid $50 for 4, and you get them cheaper in bulk) and I think each one is rated for 5000 lbs, so it's ridiculously over-engineered. The other consideration is something to prevent sideways movement of the yurt strong enough to move it enough to tip all the levelers. You could use dog tie out or similar to put downward force on it if you were in a very windy environment. I've used this system for 7 years in the forest in Texas, and I've had very little settling. When I do, I just get a laser level, get under there, and dial it back to level. Finally, if you have one or more feet that is really whacked, it's very easy to remove one leveler and fix the structure while its deployed. Worst case you put another temporary leveler next to the one to be fixed, do the repair, then put it back.

In my case I seriously over-engineered the number of levers because my goal was to have a platform that would come apart into no larger than 4x4 pieces so it could be transported by an average sedan. That means I have tic-tac-toe board of nine frame 2x4 pieces that bolt together. And *that* means my cross members aren't a single piece, which really lowers the rigidity of the platform. If you, instead, use traditional deck-building techniques with large, single-piece cross beams, you could use far fewer levelers to get the same effect.

The only problems are that this design is potentially higher maintenance, and you need to preserve access to the levelers, and because I dug the back feet into the ground, water goes in there when it rains hard and makes them sink a little. Still, after 7 years and a yurt filled with furniture, AC, fridge, huge cargo bed, etc., I've only very rarely had to adjust anything.

AY3tL2

22950337493_3304631ca5_b.jpg
 

Attachments

  • yurtplatformframe.jpg
    yurtplatformframe.jpg
    464.4 KB · Views: 472
Last edited:
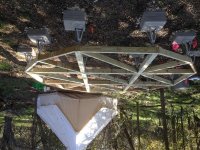
...and no, the Soul Pad bell tent in the background is *not* my yurt. This is the yurt frame on the platform:

23394723380_dcae8e0ea7_b.jpg


Also, naturally, my yurt is 12' across, not 12". :)
 
Last edited:
I’m not a fan of posts. I looked into it and it turned out to be more expensive.

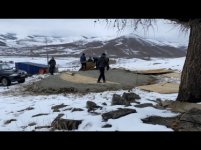
We’ve done 2 types. Rock and gravel with a wooden floor. Rocks were free on our land, gravel about $150 for 10 tons which we used for this and 2 other yurts. The wooden floor was also about $100. We’ve had a very wet summer but no issues with water ingress. We dug a channel uphill to divert water coming downhill.

BD027686-5646-4418-BA03-674AC662BDCF.jpg

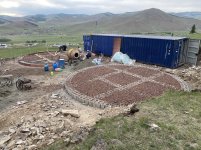
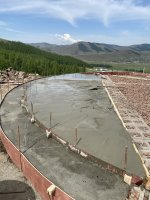
Concrete slab on grade. Perimeter and internal supports are concrete blocks. Insulation is expanded clay. The outer ring is 30cm tall, then the inner ring is another 10cm tall. Total cost was $3000 for foundations for 2 yurts of 7.2m diameter. It was a family project so labour was lower than typical.


B01EE4C3-3282-4FE3-AAA0-35053D723526.jpg

1B312DBC-94E1-4B81-B9CE-907443405D2D.jpeg

B4CACEBC-CFFE-4F5C-94C3-ECA33CFC6AF1.jpeg

333C8A66-3C1E-4026-B829-2D7492108B13.jpeg
 
Wild beautiful country there UK. Actually looks quite a bit like the Rocky Mountains I'm looking at as I type this.

I hear there’s quite a community of expat Mongolians in Colorado. I guess it feels similar to home, except higher altitude. I’ve crossed the Rockies too and I do see the similarities.
 
"I hear there’s quite a community of expat Mongolians in Colorado." Very cool to hear. Thanks.

Climate in your area looks semi arid to me. North facing slopes are treed. South are not. That's exactly how it looks in much of CO foothills to the west of Colorado Springs. Where I fish and shoot up in the mountains to about timberline at 11.5K, the terrain is remarkably similar. Alpine zone above that is all rock.

On a total side note, there's a youtube channel called 'Itchy Boots'. This motorcycle tourist gal Noraly's most recent three videos feature her riding through the HIGH Colorado rockies, including gnarly 4WD passes well above timberline. Her vlogs are generally about ~20 minutes if you have the inclination.
 
Looking at some stats, Boulder Colorado, which apparently Mongolian expats like, is at the same altitude as where I live. It also has almost the exact same annual rainfall, although it’s distributed differently. We only get rainfall in Summer in any significant quantities, whereas Boulder has it distributed more evenly throughout the year. The biggest difference is the temperatures. Due to Mongolia’s location and extreme continental climate, it’s considerably colder.
 
On a total side note, there's a youtube channel called 'Itchy Boots'. This motorcycle tourist gal Noraly's most recent three videos feature her riding through the HIGH Colorado rockies, including gnarly 4WD passes well above timberline. Her vlogs are generally about ~20 minutes if you have the inclination.

I´m follower of her channel since she started her journeys some years ago - mostly always great stuff and worth to watch.... :cool:

And you´re right Bob, she is riding in the Colorado region at the moment....

https://www.youtube.com/watch?v=opodbdbUCcU
 
Totally off yurts.

We just finished watching todays Itchy video where she ends up in Woodland Park. I believe Noraly passed through Colorado Springs earlier this week. Expecting she will mention the Springs in the next vid. Or not. She really doesn't like big cities.

If there's one thing that chick does really well it's finding a beautiful ride through country she has never seen before. It's a real skill. I doubt she's ever been here and> BAM< she nails the CO backcountry roads even lots of Coloradans never see. For sure we have gotten a good view of central America thanks to her. . Man-what a BEAUTIFUL place that is. Noraly is one smart woman.
 
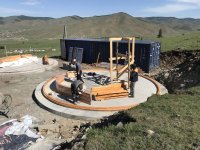
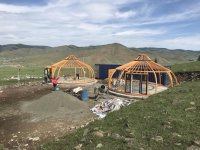
After much debate i finally made the choice and having the screw poles being done and believe it or not, but they prove the solution as they had to go 5 feet deep or nearly 14 meters deep. The wooden frame is now being setup so the platform can be finished.
 
Back
Top