Ad

Masonry Heater for my Yurt

hierony

New member
So winter is coming. I've been heating with electricity & a propane space heater, but that gets expensive. The propane isn't vented, which is not great (I've a CO monitor though, & have measured CO with a Fluke meter--no carbon monoxide produced; don't want to run it overnight though). Wood is readily available in my area, very cheap if you do all the work & not too expensive if you only do some of the work (getting logs out of woods, cutting into rounds, quartering, stacking, etc), and is renewable & carbon neutral.

Because yurts aren't terribly well insulated or air-tight & have little thermal mass, I don't think standard wood stoves are a good match for heating a yurt. They'll easily heat the yurt when running, but things will get cold pretty fast when you aren't burning anymore. From the sounds of other's experience, it's hit or miss whether you can get your stove to put out enough heat overnight without stoking it halfway through. I've already noticed with the propane heater that though it increases the air temp quickly, all the mass takes a while to warm up (ie, the bed).

So I decided to go with a masonry heater. It has a small footprint (~30x30 inches), should burn very clean & efficiently, will heat continuously so there won't be cold/hot cycles & all the yurt mass will be warm (not just the air). Plus it won't present a burn hazard for people or pets. Cost is around $1k ($200 design fee, $350 firebrick/facing bricks, ~$300 door/ports/refractory cement/misc materials, plus chimney).

I have a strawbale platform & the heater will be heavy, so I had to do something a little different for the foundation under the heater in the middle of the yurt. I didn't put straw bales there. Instead, a layer of leveling sand, cinder blocks to distribute the load & match the wood platform level, a sheet of steel to distribute contact point loads, then a reinforced lightweight-aggregate concrete (perlite & expanded shale), then 1/2" cement board. The cinderblocks can carry quite the load, & everything else will do great in compression & is _not_ burnable.
 
I'm building slowly, and not as neatly as I should--the little masonry experience I have was from 15 years ago...

1534-albums126-picture1192.jpg


I got the firebox mostly done the other evening, but I'm starting to run low on refractory mortar. Note the slits in the walls--this if for air intake (comes from underneath, then between the inner & outer core). This is the Austrian Eco Firebox design--one of the cleanest burning. Coupled with a heat exchange bell on top, it has a very small footprint compared to contraflow/finnish designs. The white stuff is ceramic fiber/wool/paper--it functions as an expansion joint. The firebox bricks will get really hot (1200-2000 F?), expand a little outwards & upwards--if they were attached to the outer core walls (relatively cool), the joints/bricks would break.

1534-albums126-picture1198.jpg
 
Last edited:
Got the upper half done finally!
1534-albums126-picture1209.jpg


I just need to get another masonry bit for my jig saw to finish cutting the stove pipe hole:
1534-albums126-picture1211.jpg


Next I will need to put up the facing (cement bricks held 1/4" from the core), but that should be a lot less complicated.

To dry out the heater core, I've a little electric space heater running almost all day in the firebox. Should get things nice & dry by the time I actually have everything done & setup (facing; firebox, air intake, & cleanout ports; chimney).
 
I forgot some of the other photos that I uploaded but didn't link:

1534-albums126-picture1199.jpg


1534-albums126-picture1200.jpg

Firebox done.

1534-albums126-picture1201.jpg

Vermiculite baffle on top of the firebox.

1534-albums126-picture1204.jpg

Cast refractory tile for spanning the firebox.

1534-albums126-picture1202.jpg

Tile installed.

1534-albums126-picture1203.jpg
 
Well masonry heaters generally aren't weighed per se, so you have to take any weight estimates with a grain of salt (or two). I'll move it (& the yurt again) eventually, so I may drop by a truck weigh station :P The heater sits on its own foundation & not my strawbale platform--it would have been near the bearing capacity of the straw, plus straw is combustible...
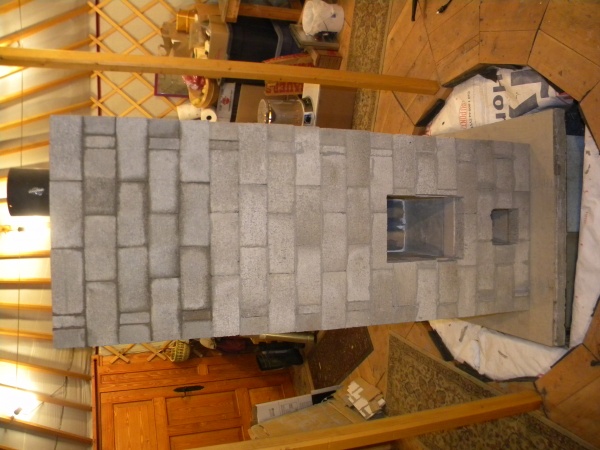
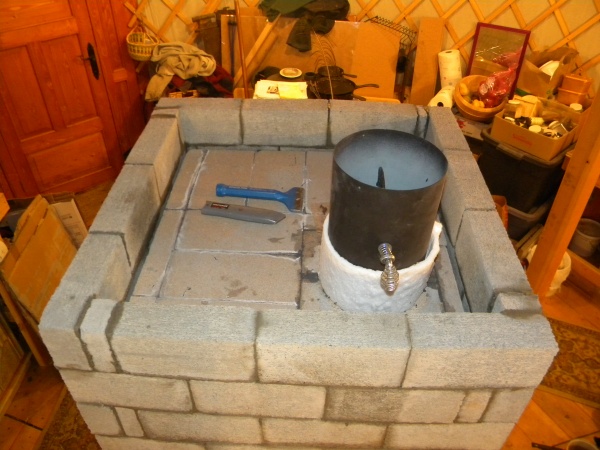
Initial estimates put it at 1500-2000 lbs. I used ~180 firebricks (7 lbs each), plus ~70 lbs refractory mortar; there's also the 45 lbs steel sheet, ~150 lb lightweight concrete slab, & 10 lbs(?) backerboard. There's a 2" slab of perlcrete + 2" of mortar on top of the heater core to seal it off once I get the facing done. My facing brick estimate seems to be off, so there will be a lot of weight there too, plus any plaster system I put on it. The whole heater will likely weigh more than the yurt & platform by the end of it!
 
Wow. Glad you put it on its own foundation lol. That is going to be a heavy sucker.
 
Full size masonry fireplaces sit on a pad or other structure that bears on the ground. This is way lighter than that, but a ton is way the heck too much weight for a floor frame. Thanks for the photos hierony.
 
Well, I might say a properly designed/very stoutly built wood frame _could_ hold up a ton spread over a good 5 sq feet (400 psf)--wood is pretty decent in compression. But I don't think it would be worth the effort/cost & it's good to have a non-combustible support under a wood stove...
 
Got the facing done--it'll eventually get covered with plaster.
1534-albums126-picture1216.jpg

1534-albums126-picture1212.jpg


Now to cap the core:
1534-albums126-picture1214.jpg


If I can find reasonably priced chimney pipe around, I might be able to get it burning soon!
 
The heater is basically done now. Air inlet & cleanout ports are mortared in, firebox door is in place (screws in frame hold holes drilled in brick facing) & insulated, all doors/ports sealed on the outside with silicone to prevent air/smoke leakage.
1534-albums126-picture1219.jpg


Core is capped with ~3 inches of perlcrete & 1/2 to 1 inch of thinset mortar.
1534-albums126-picture1218.jpg


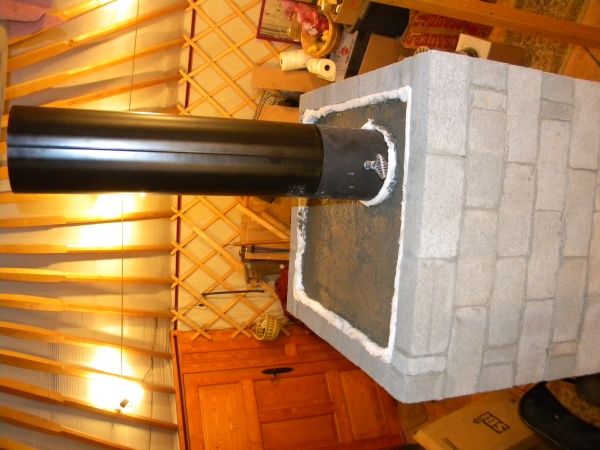
Now to get the chimney figured out. I was thinking of using leftover ceramic insulation to make my own double-wall chimney pipe, but the minimal stovepipe/chimney (~8 ft) might not give enough draft & I wouldn't easily make more. Plus good quality stainless steel pipe in the right sizes wouldn't really be cheaper. So I bought some chimney pipe...

Bob, you've mentioned trying to make your own insulated double-wall pipe with fiberglass insulation, right? I think you said it didn't work well but didn't say why?
 
It burned. Not burned really, it kinda cooked. Really really weird when I pulled it out. Don't insulate between pipes with fiberglass.

That is one fine looking piece of work. VERY nicely done.
 
Can't say enough positives about that stove. I'm really floored by the build. Thanks again for putting this on here for all to see what a 'I'm GONNA do that.' attitude will get you. No fear. Go for it.
 
I wondered about that--it's always good to check material properties. It looks like fiberglass insulation burns/melts about 1000 F (EngineeringToolbox, usually good general info), so it should technically have been alright. I thought I saw something about it really only being good to 600 F (melting temp?) or such though. The ceramic stuff I got for building the stove is rated to 2012F, so definitely good--but too much work for minimal savings :P

I got the chimney up, though I need to get the roof flap sealed up properly again. I'm learning to build fires in the dang thing, plus it's only supposed to get 1/3-1/2 firebox capacity the first week so it dries out slowly/doesn't break mortar joints. I'll post chimney pictures once I get it all sorted.
 
It's the moment where all my ideas finally meet up with the hands-on part--a little frustration, some learning & adapting, then things should work. I seem to forget how to light fires effectively. In messing with the crown ring flap the yurt is a little more drafty until I fix it, and our area just dropped to the 30's with some snow...

So far I've resorted to a propane torch, dousing the wood with ethanol, burning a few free newspapers. Now I'm on to actually making kindling, plus I found the real matches. The heater isn't supposed to get full firings yet & it's slow to fully heat up, so I won't know how well it actually works another day or so (after I get my fire-making back up to par).

I'm regretting not getting it finished before the weather got cold :P
 
Back
Top