Ad

Homemade yurt

Bob Rowlands

New member
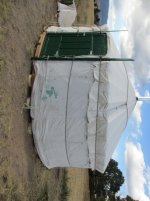
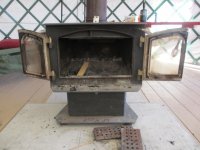
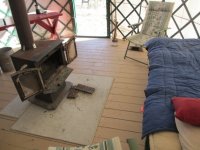
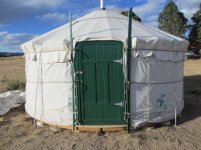
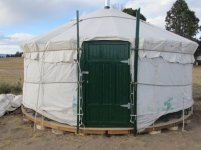
I finally have pics as promised months ago. My wife kindly loaded these pics of my 16' home made yurt. The yurt sits on a low platform framed of standard deck materials, on concrete pads. This is a test, if the first two show up, then we'll post the others.
 

Attachments

  • IMG_1605.jpg
    IMG_1605.jpg
    94 KB · Views: 1,264
  • IMG_1606.jpg
    IMG_1606.jpg
    185.1 KB · Views: 1,022
Re: Yurt Forum How-to

Okay, it worked, here are the others. Robo
 

Attachments

  • IMG_1607.jpg
    IMG_1607.jpg
    96.5 KB · Views: 1,242
  • IMG_1608.jpg
    IMG_1608.jpg
    96.2 KB · Views: 1,253
  • IMG_1609.jpg
    IMG_1609.jpg
    94.8 KB · Views: 1,029
  • IMG_1612.jpg
    IMG_1612.jpg
    95.3 KB · Views: 1,149
  • IMG_1614.jpg
    IMG_1614.jpg
    98.3 KB · Views: 1,161
  • IMG_1615.jpg
    IMG_1615.jpg
    98.6 KB · Views: 1,338
  • IMG_1616.jpg
    IMG_1616.jpg
    96.9 KB · Views: 1,401
  • IMG_1617.jpg
    IMG_1617.jpg
    95.1 KB · Views: 1,225
  • IMG_1618.jpg
    IMG_1618.jpg
    96.2 KB · Views: 1,028
  • IMG_1619.jpg
    IMG_1619.jpg
    94.6 KB · Views: 1,464
Re: Yurt Forum How-to

HA! I had her load these on the wrong thread! lol I'm a rufus. :)

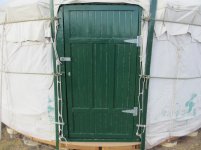
Deets: The door is five panel Mongolian style. Half lap construction.

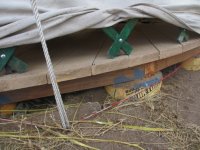
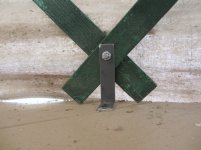
The platform is standard 2X deck construction. I anchored the wall lattice 1.5" inside the platform perimeter with short lengths of 3/4" strap steel, bent to 90 degrees, drilled to accept the lattice through bolts, and screwed to the deck. Very solid.

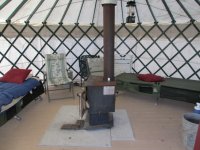
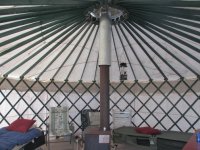
I made the double wall pipe since $300 for stovepipe was totally out of the question.

Roof canvas loops are attached to 1/8th cable running through ten concrete anchors surrounding the perimeter of the platform. The roof canvas is also anchored with old climbing rope to five of the perimeter anchors.

The rafter ring tonoo is cable anchored down to a concrete pier located under the platform. The cable runs aside the stovepipe.

I got $620 in the deck and probably $800 in construction and covering materials. About two weeks labor to build, including deck.
 
Re: Yurt Forum How-to

For plans, google: how to build a mongolian yurt clan yama kaminari

To see additional pics of a 16' yurt very similar to mine, google: rotten luck guild yurt, and click on pics.

Note: If you are considering building this type of yurt, do 'NOT' use crap MDF 1X for rafters like the dude did on rotten luck guild yurt. Use wood 1x3s. Just trust me on this. :D
 
Re: Yurt Forum How-to

More deets.

The wall covering is made from 9x12, 12 oz Home Depot drop cloths, cut in half to make two 9x6, hemmed and attachment loops added every 17" around the top to hang on the wall lattice crosses.

The roof canvas was made from a 20x24, 17oz double fill water treated canvas tarp. I cut and modified it to fit the conic shape roof, flat felled the seams, and added perimeter loops.

All the wall, roof, and toono was made from standard construction materials ripped to size, etc. The wall is bolted on 12" centers, with 1.5" 1/4-20 bolts and nyloc nuts. No washers they rattle like crazy unless snugged down tight. But then you can't unfold the khana. :D

Full construction deets are in that 'mongolian yurt build' site on google.

Ok, now I'm done.
 
Looks great. Been waiting for someone to post their experience with this design and here we are. Dig the door. I've been planning on giving this design a try myself sometime next spring/summer with some mods. This should inspire a few folks with limited resources to give it a shot. Thanks for the pics!!
 
Sorry for the double post. I didn't click on page two when I checked to see my first post. I'm definitely computer challenged. :/

Nice yurt Marshall. The yurt looks identical. Kids or grandkids? My grandsons are 5 and 7, and like 'papas yurt'. heh heh. Granddaughter too she's 11.

Had a nice warm fire in there yesterday as a cold front moved through. Yurt kinda drafty through gaps in the 2x6 deck boards now that the wood is drying out. 'Kiln dried' doesn't mean 'done dried out' now, does it? lol Gonna have to caulk them at some point since I don't have a dozen deer hide laying around. :D

Off to work have a good day all.
 
Couple more details for those interested in the construction.

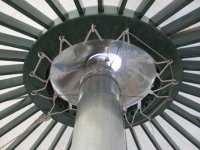
I stitched 14 loops into the hemmed edge of the roof canvas smokehole, and roped them to screw eyes installed in the bottom of the tonoo. That solidly anchors the cover to the frame, with zero flapping or shifting in the 60 mph wind we get here.

I centered the stovepipe in the smokehole with tie wire anchored to the screw eyes. One doubled up wire loops atround the pipe, and seperates legs attach that loop to the screw eyes. It can be blowing a gale and that stovepipe stays put.

I used a 3/16ths vinyl coated cable to tension the walls. I got my tension cable wrapping entirely around the yurt, including over the door frame. The first time I erected the yurt, a really had to jack around getting the cable length just right to get a perfect tight fit of rafters to roof ring. Once done, don't undo it. Clip the loops in either end into a carabiner. Wallah-perfect.

For a camping yurt that gets taken apart, leaving the cable at the correct length makes reerecting the yurt a snap. Simply install the cable into the lattice crosses right after you got your walls attached to door frame. The cable 'forces' the wall lattice into the exact circumference for easy rafter and tonoo install. No rafters gonna bop you on de head. :D
 
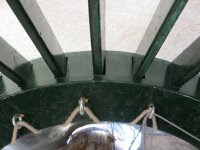
Yes I did. And yes it is two plywood rings with spacers. You have a good eye for detail. If you have an interest, the construction details of the yurt ring, and in fact my entire yurt, is online. Google:

Clan Yama Kaminari/ how to build a Mongolian yurt.

Scroll down the main page a short way and click on 'yurt construction' on the left center of the page. Then, scroll well down into the construction procedure and you'll see that ring in detail. Good solid yurt. BTW be sure you anchor your yurt to the platform, or the ground. Or both. :D


I did modify the spacer block detail. I didn't use the 3/4 board spacers. I made all the spacer blocks on mine from a 4x4x8', ripped to height and thickness, and cut to angle with a chop saw. I have a 35 rafter ring. For angles, I layed out the rafter spacing right on one of the plywood rings, and pulled the cut angles off that. Also, instead of 2.5" spacer depth, I went with 3.5" for extra gluing surface and wider screw spacing.

During assembly, I glued the blocks with construction adhesive, layed to penciled lines, and pin nailed in place. Drilled 1/8th" pilot holes through the plywood and into the spacer, and fastened with three, plated 3" drywall screws. That mother is solid lemme tell ya. :D. That ring should stand up to any snow load we get here.

 
Back
Top